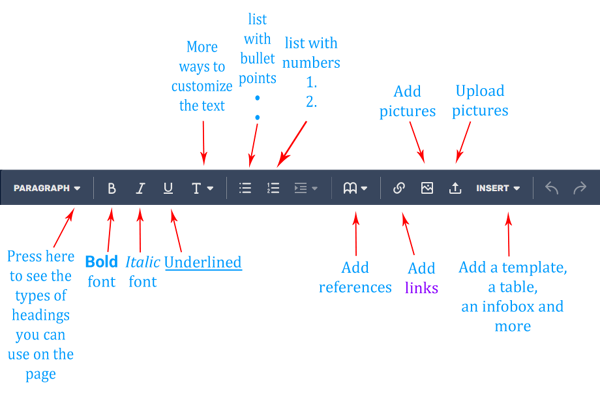
Are you a new contributor who has just joined and does not know what to do? Working on your favorites wikis might seem to be quite complicated, however, we're here to help you! In this guide we will have a look at our Visual Editor and focus on how to add Infoboxes, Tables and Categories to help you structure your article.
Visual Editor[]
When you press "edit" on a page, it opens the Visual Editor — the tool that the platform uses to help contributors organize and structure articles better. This is what you can do with the tool bar on top of the editor:
Infoboxes[]
Infoboxes serve as a brief fact file about the topic of the article. They are usually displayed on the top right side of article pages on Desktop, or at the very top on Mobile. This is how we add an infobox:
- We click INSERT on the toolbar, find the word Infobox, click on it and choose the name of an infobox that exists on the current wiki;
- We see the fields that we need to fill in (and ignore the ones we do not need);
- After we are done, we press .
Tables[]

Adding a table in 2 clicks
Tables are a great way to display data on our articles. Here is how we add a table:
- We click INSERT on the toolbar;
- Press 'Table';
- Job done! You are amazing!
Table parameters[]
You can play with the table in any way you want by pressing on arrows next to each cell: delete/add rows/columns, highlight a few cells to merge them into one, and so on, to fit your data's needs.
You can also find some default settings by pressing 'Properties' after your table has been created or when you select a cell:
Caption is a big heading for the whole table.
Styled means we use the default Fandom table styling instead of writing a code.
Sortable means there is an arrow to sort everything in our table by alphabet.
Collapsible means the content can be hidden with a button (and collapsed initially = it is hidden when we open the page).
Categories[]
Categories are important for keeping articles organized. Categories allow people to narrow down their searches on the wiki, and allows admins to keep track of all the pages related to the same topic. If you're not sure which ones to add, look at similar pages, or check with the local admin!
- Save the article;
- Scroll all the way down, find the word "Categories";
- Click on it and press ;
- Type in the name (for example, "Items" and then inside them "Healing Items"), press Enter to make sure the category is added to the list. The new category will have a frame around it:
- After we have added everything we wanted, we press .
It's easy, right? Now you know what you need to start organizing and structuring an article in a basic way!


